End-to-End (E2E) Testing Strategy: The Engineering Standard
This guide outlines the mandatory expectations for all End-to-End (E2E) automated testing. E2E tests are our final line of defence, verifying that complete user journeys function correctly from the UI down to the database. We utilise Playwright as our standard automation framework.
SDLC Phase: Automated CI/CD & Non-Functional Testing
📌 1. The Purpose of E2E Tests
SDLC Phase: Automated CI/CD & Non-Functional Testing
Unlike unit or integration tests, E2E tests validate the system as a whole. They are designed to:
- Ensure critical user flows (e.g., login, multi-car quote generation, checkout) work seamlessly.
- Catch regressions in the UI/UX layer.
- Verify cross-browser and cross-device compatibility.
- Provide a safety net for major architectural or infrastructure changes.
🏗️ 2. Architectural Standards: Page Object Model (POM)
SDLC Phase: Automated CI/CD & Non-Functional Testing
To maintain a scalable and readable test suite, all E2E tests must adhere strictly to the Page Object Model (POM) design pattern.
- Separation of Concerns: Test files (
*.spec.ts) should contain only the test logic (assertions and flow). Interaction logic (locators and actions) must reside in separate Page classes. - Reusability: Common components (e.g., navigation bars, generic modals) should be abstracted into reusable objects rather than duplicated across Page classes.
- Encapsulation: Locators should be private or protected within the Page class, exposing only meaningful action methods (e.g.,
login(username, password)instead offillUsername(),fillPassword(),clickSubmit()).
Example Structure:
// pages/LoginPage.ts
import { Page, Locator } from '@playwright/test';

export class LoginPage {
  readonly page: Page;
  private readonly usernameInput: Locator;
  private readonly passwordInput: Locator;
  private readonly submitButton: Locator;

  constructor(page: Page) {
    this.page = page;
    this.usernameInput = page.locator('#username');
    this.passwordInput = page.locator('#password');
    this.submitButton = page.locator('button[type="submit"]');
  }

  async login(username, password) {
    await this.usernameInput.fill(username);
    await this.passwordInput.fill(password);
    await this.submitButton.click();
  }
}
Tangible Example: Test Implementation using POM
// tests/login.spec.ts
import { test, expect } from '@playwright/test';
import { LoginPage } from '../pages/LoginPage';
import { DashboardPage } from '../pages/DashboardPage';

test.describe('Authentication Flow', () => {
  test('User can successfully login with valid credentials', async ({ page }) => {
    // 1. Arrange
    const loginPage = new LoginPage(page);
    const dashboardPage = new DashboardPage(page);

    // Create ephemeral test data via API
    const testUser = await createEphemeralUserAPI();

    await page.goto('/login');

    // 2. Act
    await loginPage.login(testUser.username, testUser.password);

    // 3. Assert (using web-first assertions)
    await expect(dashboardPage.welcomeMessage).toBeVisible();
    await expect(page).toHaveURL('/dashboard');
  });
});
📊 3. Resilient Test Data Management
SDLC Phase: Automated CI/CD & Non-Functional Testing
E2E tests must be robust and repeatable. Poor test data management is the leading cause of flaky tests.
- Dynamic Generation: Tests should create their own required data via API calls or database seeding before execution, rather than relying on existing, potentially fragile, state.
- Isolation: Each test run should ideally use unique data (e.g., unique user accounts per run) to prevent collisions during parallel execution.
- Teardown: If tests mutate shared environments, ensure proper teardown scripts exist, although ephemeral environments are strongly preferred.
🛡️ 4. Stability & Flakiness Prevention
SDLC Phase: Automated CI/CD & Non-Functional Testing
We have a zero-tolerance policy for flaky tests in the main branch.
- Awaits & Assertions: Never use arbitrary hardcoded sleeps (e.g.,
page.waitForTimeout(5000)). Always use Playwright's auto-waiting web-first assertions (e.g.,expect(locator).toBeVisible()). - Retries: Configure Playwright to retry failed tests only on CI, not locally. A test that passes on the second try is a flaky test and must be investigated.
- Trace Viewers: Always enable Playwright Traces on failure in CI to facilitate rapid debugging.
🚀 5. CI/CD Integration
SDLC Phase: Automated CI/CD & Non-Functional Testing
E2E tests are integrated into our continuous delivery pipelines.
- Execution Strategy: Run the full E2E suite nightly or post-deployment to staging. Consider using ADO Playwright Sharding Templates to accelerate test execution.
- Smoke Suite: Maintain a tagged
@smokesubset of critical E2E tests that run on every PR to prevent major breakages. - Cross-Browser: CI executions should run against Chromium, Firefox, and WebKit (Safari).
🔄 6. E2E Code Lifecycle Flow
SDLC Phase: Automated CI/CD & Non-Functional Testing
This flow outlines the lifecycle of a code change as it moves through automated gates, from a developer's local machine to production, within a multi-stream (S1, S2, S3) architecture.
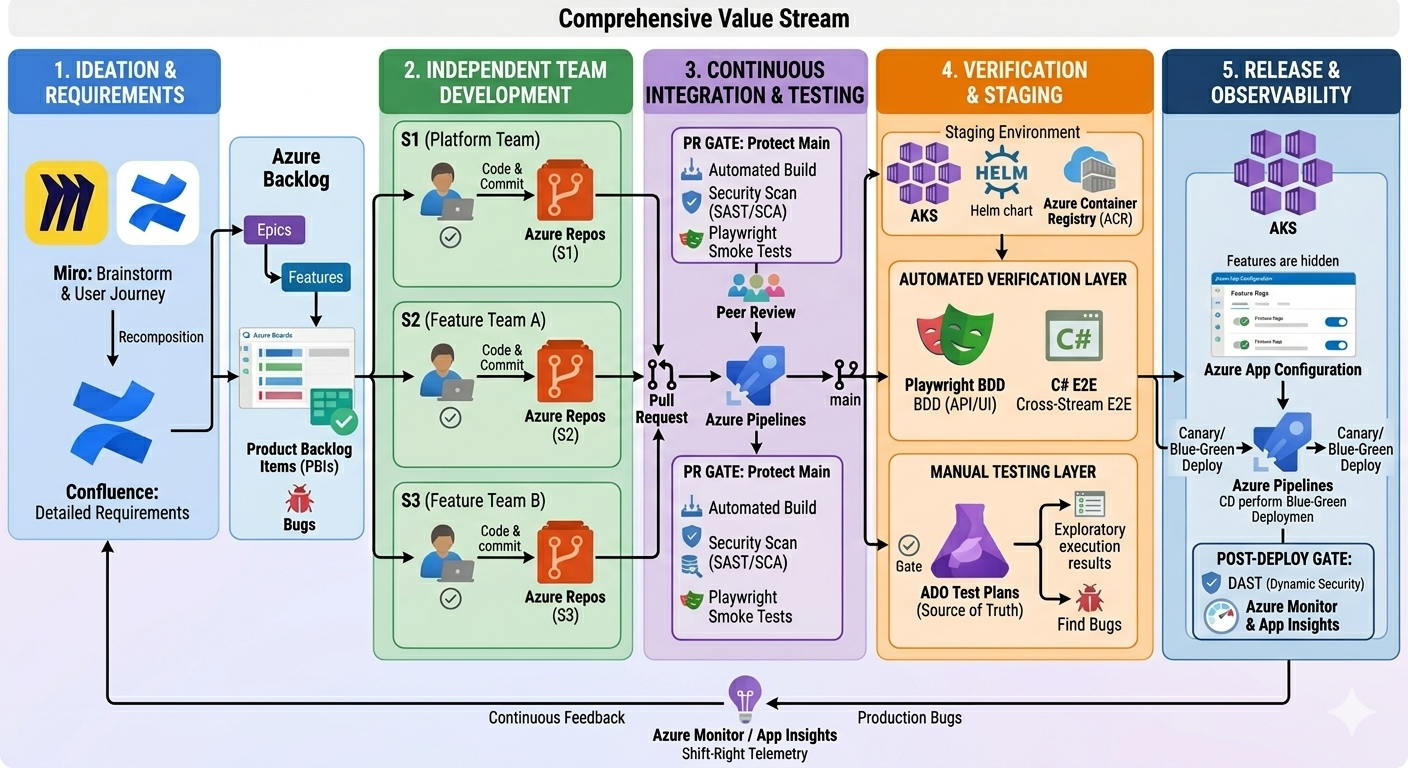
1. Local Machine (The Inner Loop)
- Action: Developer pulls PBI/Bug details from Azure Boards.
- Documentation: References Confluence for specs and Miro for architecture.
- Gate 0 (Pre-Commit): Local Unit Tests and Linting.
- Commit: Code is pushed to a feature branch in the stream's Azure Repo.
2. Pull Request (The Entry Gate)
- Trigger: PR created in Azure Repos.
- Automated Gate 1:
- Build: Successful compilation.
- Shift-Left Security: SAST (Static Analysis) and SCA (Dependency Scan).
- Smoke Test: A subset of Playwright BDD (TypeScript) API tests.
- Manual Gate: Peer review by team members.
3. Development Environment (Continuous Integration)
- Trigger: Merge to main.
- Infrastructure: Azure Pipelines builds a Docker image, pushes it to ACR, and deploys it to the AKS Dev Namespace.
- Automated Gate 2:
- Functional Testing: Full Playwright BDD (TypeScript) suite (UI & API).
- Contract Testing: Ensuring S1, S2, and S3 interfaces remain compatible.
4. QA Environment (Validation)
- Trigger: Automated deployment following successful Dev tests.
- Testing Layer:
- Manual Exploratory Testing: Managed via ADO Test Plans (The Source of Truth).
- Regression: Full execution of automated BDD scenarios.
- Automated Gate 3: All tests must pass; results are automatically linked to the ADO Test Plan and the PBI.
5. Regression & E2E (Cross-Stream Integration)
- Scope: Validating the entire system (S1 + S2 + S3).
- Testing Layer: System E2E Framework (C#). This validates complex, long-running business journeys that cross microservice boundaries.
- Automated Gate 4: System-wide integrity check. If S3 breaks S1’s logic here, the promotion is halted.
6. Pre-Production (Staging/Hardening)
- Environment: A mirror of Production in a dedicated AKS Namespace.
- Testing Layer:
- DAST: Dynamic security scanning.
- Performance/Load Testing: Ensuring the cluster handles expected traffic.
- Gate 5: Stakeholder "Sign-off" in ADO Test Plans.
7. Production & Monitoring (The Outer Loop)
- Deployment: Azure Pipelines performs a Canary or Blue-Green deployment to the AKS Production cluster.
- Release: Features are initially hidden behind Azure App Configuration (Feature Flags).
- Shift-Right Monitoring:
- Azure Monitor/App Insights: Tracks real-time telemetry.
- Automated Rollback: Triggered if error rates exceed thresholds defined in the S1 Platform error budget.
Automated Gate Summary Table
| Stage | Trigger | Primary Tool | Gate Requirement |
|---|---|---|---|
| Commit | Local Git | IDE / CLI | Unit Tests Pass |
| PR | Repo Merge | Azure Pipelines | SAST + Smoke Tests |
| Dev | CI Trigger | Playwright BDD | API / UI Functional Pass |
| QA | Promotion | ADO Test Plans | Exploratory + Full BDD Pass |
| Reg/E2E | Multi-Stream | C# Framework | Cross-Service Journey Pass |
| Pre-Prod | Release Gate | DAST / Load | Security & Performance Pass |
| Prod | Approval | Azure Monitor | Health & SLO Stability |
Knowledge Management
- Miro: Used for Post-Mortems and visualising cross-stream dependencies during the "Regression" phase.
- Confluence: Automatically updated with release notes and API documentation generated from the S1, S2, S3 build pipelines.
⚖️ 7. Spelling & Formatting Conventions
SDLC Phase: Automated CI/CD & Non-Functional Testing
- UK English: Adhere strictly to UK English spelling across all documentation, test descriptions, and variable names (e.g.,
initialisation,optimise,colour). - Descriptions: Test descriptions should read as business requirements (e.g.,
test('User can complete a multi-car quote', async ({ page }) => { ... })).
🔀 8. Parallel Execution & Sharding with Cucumber-js
SDLC Phase: Automated CI/CD & Non-Functional Testing
Since you are sticking strictly to the standard Cucumber-js runner, you cannot use the native Playwright --shard flag. Instead, you can achieve identical results by using a directory-based split or tag-based split within the Azure DevOps matrix.
The most reliable way to "shard" without extra packages is to split your features by folder. This ensures the workload is distributed across different compute nodes.
The Reusable ADO Template (cucumber-shard-template.yml)
This template uses a featurePath parameter. Each team can pass different folder paths to different matrix legs to run them in parallel.
# templates/cucumber-shard-template.yml
parameters:
- name: nodeVersion
  type: string
  default: '20.x'
- name: shards
  type: object
  default:
    Shard1: 'features/login'
    Shard2: 'features/checkout'
    Shard3: 'features/account'

jobs:
- job: Cucumber_Parallel_Run
  strategy:
    matrix: ${{ parameters.shards }}

  pool:
    vmImage: 'ubuntu-latest'

  steps:
  - task: UseNode@1
    inputs:
      version: ${{ parameters.nodeVersion }}

  - script: npm ci
    displayName: 'Install Dependencies'

  - script: npx playwright install --with-deps
    displayName: 'Install Browsers'

  # 'value' here represents the directory path passed in the matrix
  - script: npx cucumber-js $(value) --format progress
    displayName: 'Running Features in $(value)'
    env:
      CI: 'true'
Implementation for Teams
Each team defines their own "shards" based on their folder structure. This allows them to balance the load manually.
# team-repo-pipeline.yml
resources:
  repositories:
    - repository: templates
      name: GlobalResources/DevOps-Templates

jobs:
- template: cucumber-shard-template.yml@templates
  parameters:
    shards:
      Identity_Tests: 'features/identity'
      Payment_Tests: 'features/payments'
      Search_Tests: 'features/search'
      Legacy_Tests: 'features/common'
Handling the "60-Minute" Problem with Tags
If your folders are not evenly sized, you can shard by tags instead. This is often more precise for Cucumber-js.
Change the script line in the template to:
- script: npx cucumber-js --tags "$(value)"
And the team definition to:
parameters:
  shards:
    Smoke: '@smoke'
    Regression_Part1: '@regression and not @slow'
    Regression_Part2: '@slow'
Summary of Benefits for Isolated Repos:
- Total Isolation: Each compute node is independent; there is no shared state between Cucumber instances.
- No New Dependencies: Stays within the standard cucumber-js and playwright core.
- Scalability: If a team's test suite grows, they simply add a new line to their shards object in their local YAML file to spin up an additional agent.
Business Case & ROI
Investing in automated End-to-End (E2E) testing is a strategic decision that balances upfront engineering effort against long-term operational resilience and delivery velocity. While unit and integration tests verify the correctness of isolated components, only E2E tests validate the user journeys that generate business value.
Key Metrics and Targets
To measure the effectiveness of our E2E automation suite, teams must align on and track the following key performance indicators:
- Critical Regression Detection Rate (Target: ≥95%): The proportion of critical functional regressions caught by the automated pipeline before code reaches production. The goal is to detect and address regressions in staging, eliminating manual exploratory overhead for known workflows.
- Deployment Confidence Index: Calculated as the ratio of successful deployments (no immediate rollbacks or hotfixes required) to total deployments. Implementing a gate of automated E2E tests directly correlates with achieving a high deployment confidence level, allowing the business to ship features faster.
- Mean Time to Detect (MTTD): The automated pipeline aims to reduce MTTD of regression bugs from days (with manual cycles) to minutes.
Balancing Execution Cost vs. Deployment Confidence
E2E testing is computationally expensive and requires ongoing maintenance. Therefore, our strategy relies on a tiered testing model to optimise resource allocation:
- Smoke Suite (High Confidence, Low Cost): A lightweight subset of critical paths (e.g., user authentication, core transaction completion) executing on every Pull Request. Running in under 5 minutes, it prevents catastrophic regressions from blocking integration branches.
- Nightly Full Regression (Maximum Confidence, Controlled Cost): The complete E2E test suite runs overnight or post-deployment to pre-production environments. This limits continuous compute costs while ensuring comprehensive coverage across multiple browsers and screen sizes.
ROI of Automating Repetitive Manual Paths
Manual regression testing is a recurring cost that scales linearly with the complexity of the application. Automated testing, by contrast, requires a higher initial investment but scales at near-zero marginal cost per execution.
- Developer and QA Hours Reclaimed: If a manual regression cycle of a core product takes two QA engineers 8 hours to execute, automating this suite saves 16 engineering hours per release. Over weekly releases, this reclaims hundreds of hours annually, allowing QA specialists to focus on high-value exploratory and security testing.
- Time-to-Market Acceleration: Automating the validation gates cuts the release cycle duration. Instead of waiting for manual sign-off, teams can deploy features continuously, accelerating feedback loops and business agility.
- Mitigation of Production Incident Costs: The cost of fixing a bug in production is order-of-magnitude higher than fixing it in development. Preventing a single critical checkout failure in production offsets the cost of designing and maintaining the entire E2E test suite.
Practical Day-to-Day Takeaways
Maintaining a high-quality test suite requires strict adherence to coding standards and design principles. These rules ensure our E2E codebase remains clean, readable, and resilient to application changes.
Page Object Model (POM) Design Rules
All page interactions must be encapsulated within POM classes. Follow these explicit design rules:
- Zero Assertions in POMs: Page objects must not contain assertions (e.g.,
expect). Assertions are the responsibility of the test file (*.spec.ts). POM classes should only model the page's structure and behaviour. - Fluent API Methods: Methods inside POM classes should return another page object when an action triggers a transition (e.g.,
login()returns a newDashboardPage), or returnthisfor chaining actions within the same page. - Lazy Locator Evaluation: Do not resolve element values during class initialisation. Define locators using the
page.locator()syntax so that they are evaluated only at the moment of interaction. - Encapsulate Implementation Details: Hide the underlying CSS/XPath selectors and DOM hierarchy. A test should only interact with public methods (e.g.,
userProfile.updateEmail('user@example.com')) rather than interacting directly with input fields.
Using Custom data-testid Attributes
To decouple test scripts from visual styling and structural changes, all teams must use custom test attributes.
- Standard Attribute: Use
data-testidas the primary selection mechanism. Avoid selecting by class names, IDs (which might be dynamic or auto-generated by frameworks), or generic tag hierarchies. - Kebab-Case Naming Convention: All
data-testidvalues must use kebab-case formatting (e.g.,data-testid="login-submit-button",data-testid="quote-result-card",data-testid="error-banner"). - Stability of Locators: Visual updates (e.g., changing styling libraries, modifying class names, or restructuring layout components) should not break the test suite as long as the functional contract remains the same and
data-testidis preserved.
Test Flakiness Mitigation Checklist
Before submitting a Pull Request containing E2E test changes, developers must run through this checklist to guarantee execution stability:
- No Hardcoded Wait Times: Confirm that
page.waitForTimeout()orsetTimeout()is not used. Leverage Playwright's auto-waiting features and explicit locator assertions. - Web-First Assertions: Verify all assertions use Playwright's async assertions (e.g.,
await expect(locator).toBeVisible()) which automatically poll until the condition is met. - Network and API Synchronization: Ensure that pages completing background tasks are synchronised using
page.waitForResponse()or similar mechanisms before asserting on UI changes. - Isolated Contexts and Ephemeral Data: Confirm that tests do not share mutable state. Each test must seed its own data or run with isolated browser contexts to prevent collision during parallel runs.
- Proper Teardown of Environmental State: If the test modifies database state or configuration, ensure a reliable cleanup block (
test.afterEachortest.afterAll) runs even if the test fails.
Step-by-Step Implementation Approach
This guide details how to bootstrap a Playwright automation framework from scratch within a Node.js project, implement a standard Page Object Model, and run the tests in local and CI environments.
1. Initialisation and Installation
Begin by initialising a Node.js project and installing the necessary packages for Playwright and TypeScript support.
Run the following commands in your project root:
# Initialise a new Node.js project
npm init -y

# Install Playwright, TypeScript, and Node.js type definitions as development dependencies
npm install --save-dev @playwright/test typescript @types/node

# Install the required Playwright browser binaries and system dependencies
npx playwright install --with-deps
2. Configuration Setup (playwright.config.ts)
Create a playwright.config.ts file in your root directory to configure execution environments, retry logic, reporting, and browser targets.
import { defineConfig, devices } from '@playwright/test';

export default defineConfig({
  testDir: './tests',
  fullyParallel: true,
  forbidOnly: !!process.env.CI,
  retries: process.env.CI ? 2 : 0,
  workers: process.env.CI ? 4 : undefined,
  reporter: [
    ['html', { outputFolder: 'playwright-report', open: 'never' }],
    ['list']
  ],
  use: {
    baseURL: process.env.BASE_URL || 'http://localhost:3000',
    trace: 'on-first-retry',
    screenshot: 'only-on-failure',
    video: 'retain-on-failure',
    actionTimeout: 10000,
    navigationTimeout: 15000,
  },
  projects: [
    {
      name: 'chromium',
      use: { ...devices['Desktop Chrome'] },
    },
    {
      name: 'firefox',
      use: { ...devices['Desktop Firefox'] },
    },
    {
      name: 'webkit',
      use: { ...devices['Desktop Safari'] },
    },
  ],
});
3. Page Object Model (POM) Implementation
Create a structured directory layout for pages and tests:
mkdir -p pages tests
Page Object (pages/RegistrationPage.ts)
import { Page, Locator } from '@playwright/test';

export class RegistrationPage {
  private readonly page: Page;
  private readonly emailInput: Locator;
  private readonly passwordInput: Locator;
  private readonly termsCheckbox: Locator;
  private readonly submitButton: Locator;

  constructor(page: Page) {
    this.page = page;
    this.emailInput = page.locator('[data-testid="registration-email-input"]');
    this.passwordInput = page.locator('[data-testid="registration-password-input"]');
    this.termsCheckbox = page.locator('[data-testid="registration-terms-checkbox"]');
    this.submitButton = page.locator('[data-testid="registration-submit-button"]');
  }

  async navigate(): Promise<void> {
    await this.page.goto('/register');
  }

  async registerUser(email: string, password: string): Promise<void> {
    await this.emailInput.fill(email);
    await this.passwordInput.fill(password);
    await this.termsCheckbox.check();
    await this.submitButton.click();
  }
}
Test Specification (tests/registration.spec.ts)
import { test, expect } from '@playwright/test';
import { RegistrationPage } from '../pages/RegistrationPage';

test.describe('User Registration Flow', () => {
  test('should successfully register a new user account', async ({ page }) => {
    const registrationPage = new RegistrationPage(page);

    // Arrange
    await registrationPage.navigate();
    const uniqueEmail = `user-${Date.now()}@example.co.uk`;

    // Act
    await registrationPage.registerUser(uniqueEmail, 'SecurePassword123!');

    // Assert (Web-first assertions auto-wait for navigation and elements)
    await expect(page).toHaveURL('/dashboard');
    const welcomeHeader = page.locator('[data-testid="dashboard-welcome-header"]');
    await expect(welcomeHeader).toBeVisible();
    await expect(welcomeHeader).toHaveText('Welcome to your Dashboard');
  });
});
4. Running the Tests
To execute your test suite, use the Playwright CLI runner:
# Run all tests across all configured projects (Chromium, Firefox, WebKit)
npx playwright test

# Run tests in headed mode for local debugging
npx playwright test --headed

# Run tests targeting a specific browser project
npx playwright test --project=chromium

# View the generated HTML report after execution finishes (colour-coded for readability)
npx playwright show-report
5. CI/CD Integration Pipeline
Integrate Playwright tests into your build system using the following example steps. This snippet illustrates how to cache browser binaries and record test assets inside a GitHub Actions pipeline.
name: End-to-End Tests
on:
  push:
    branches: [ main ]
  pull_request:
    branches: [ main ]

jobs:
  test:
    timeout-minutes: 60
    runs-on: ubuntu-latest
    steps:
    - name: Checkout Code
      uses: actions/checkout@v4

    - name: Setup Node.js
      uses: actions/setup-node@v4
      with:
        node-version: '20.x'
        cache: 'npm'

    - name: Install Dependencies
      run: npm ci

    - name: Get Playwright Version
      id: playwright-version
      run: echo "PLAYWRIGHT_VERSION=$(node -e "console.log(require('./package.json').devDependencies['@playwright/test'])")" >> $GITHUB_OUTPUT

    - name: Cache Playwright Browsers
      id: cache-playwright
      uses: actions/cache@v4
      with:
        path: ~/.cache/ms-playwright
        key: playwright-${{ runner.os }}-${{ steps.playwright-version.outputs.PLAYWRIGHT_VERSION }}
        restore-keys: |
          playwright-${{ runner.os }}-

    - name: Install Playwright Browsers
      if: steps.cache-playwright.outputs.cache-hit != 'true'
      run: npx playwright install --with-deps

    - name: Install Playwright System Dependencies
      if: steps.cache-playwright.outputs.cache-hit == 'true'
      run: npx playwright install-deps

    - name: Run Playwright Tests
      run: npx playwright test
      env:
        BASE_URL: 'https://staging.example.co.uk'

    - name: Upload Test Report
      if: always()
      uses: actions/upload-artifact@v4
      with:
        name: playwright-report
        path: playwright-report/
        retention-days: 30